> For the complete documentation index, see [llms.txt](https://docs.saas.haut.ai/haut.ai/llms.txt). Markdown versions of documentation pages are available by appending `.md` to page URLs; this page is available as [Markdown](https://docs.saas.haut.ai/haut.ai/quick-start-guides/no-code-app-for-e-commerce-businesses/integrate-consumer-app-with-mailchimp.md).
# Integrate Consumer App with Mailchimp
Connect the Consumer App to Mailchimp so survey contacts land in your audience and each completed analysis can trigger a Customer Journey.
Connect the Consumer App with Mailchimp to turn skin analysis results into personalized customer communication. After the integration is connected, Haut.AI adds each user who leaves an email address to the Mailchimp audience you choose and sends each completed skin analysis as a **Skin Analysis Complete** event on that contact.
This page is for marketing and product teams who run a Consumer App and want its leads in Mailchimp. By the end you'll have a connected Mailchimp account, a selected audience, and data sync turned on.
This helps you:
* Grow your Mailchimp audience with contacts who have just completed a skin analysis, including their name and phone number when your survey collects them.
* Keep the subscription status compliant: contacts who tick the consent box are subscribed, contacts who do not are added as transactional and receive no marketing email.
* Start a Customer Journey from the **Skin Analysis Complete** event, for example an email with the user's results and recommended products.
To learn what is sent to Mailchimp, see [Data Sent to Mailchimp](/haut.ai/quick-start-guides/no-code-app-for-e-commerce-businesses/integrate-consumer-app-with-mailchimp/data-sent-to-mailchimp.md).
{% hint style="info" %}
The Mailchimp integration is switched on per company. If the Integrations page shows **Mailchimp isn't enabled for this account**, contact your account manager.
{% endhint %}
## Before you start
* A Consumer App on the current app version. Older apps do not show the Integrations section.
* A Mailchimp account with at least one audience. Mailchimp calls its contact lists *audiences*; see [How to find or create a Mailchimp audience](#how-to-find-or-create-a-mailchimp-audience).
* Permission to authorize third-party apps in that Mailchimp account.
## Step 1: Add contact survey questions
Mailchimp identifies contacts by email address, so the survey must collect one. Without an email answer nothing is sent for that user.
1. Open the [Consumer Apps](https://saas.haut.ai/app/skin-consultant/dashboard) tab in the SaaS platform and click the name of your app.
2. Open **Survey** in the navigation menu and click **Add question**.
3. In the **Type** menu on the right, choose **Email**.
4. Change the question text and mark the question as mandatory if every user must leave an email address.
5. Turn on **consent collection** on the Email question. The consent checkbox decides the contact's email marketing status in Mailchimp: ticked means **Subscribed**, unticked means **Transactional**.
6. Repeat for **Full name** and **Phone number** if you want those on the Mailchimp contact as well. The phone number is stored in the contact's **Phone Number** field, not as an SMS marketing channel.
7. Click **Save**.
For more information about the Email, Phone number, Full name, and consent settings, see [Special question types](/haut.ai/haut.ai-features/consumer-apps/add-and-customize-survey-into-consumer-app.md#special-question-types).
## Step 2: Connect Mailchimp
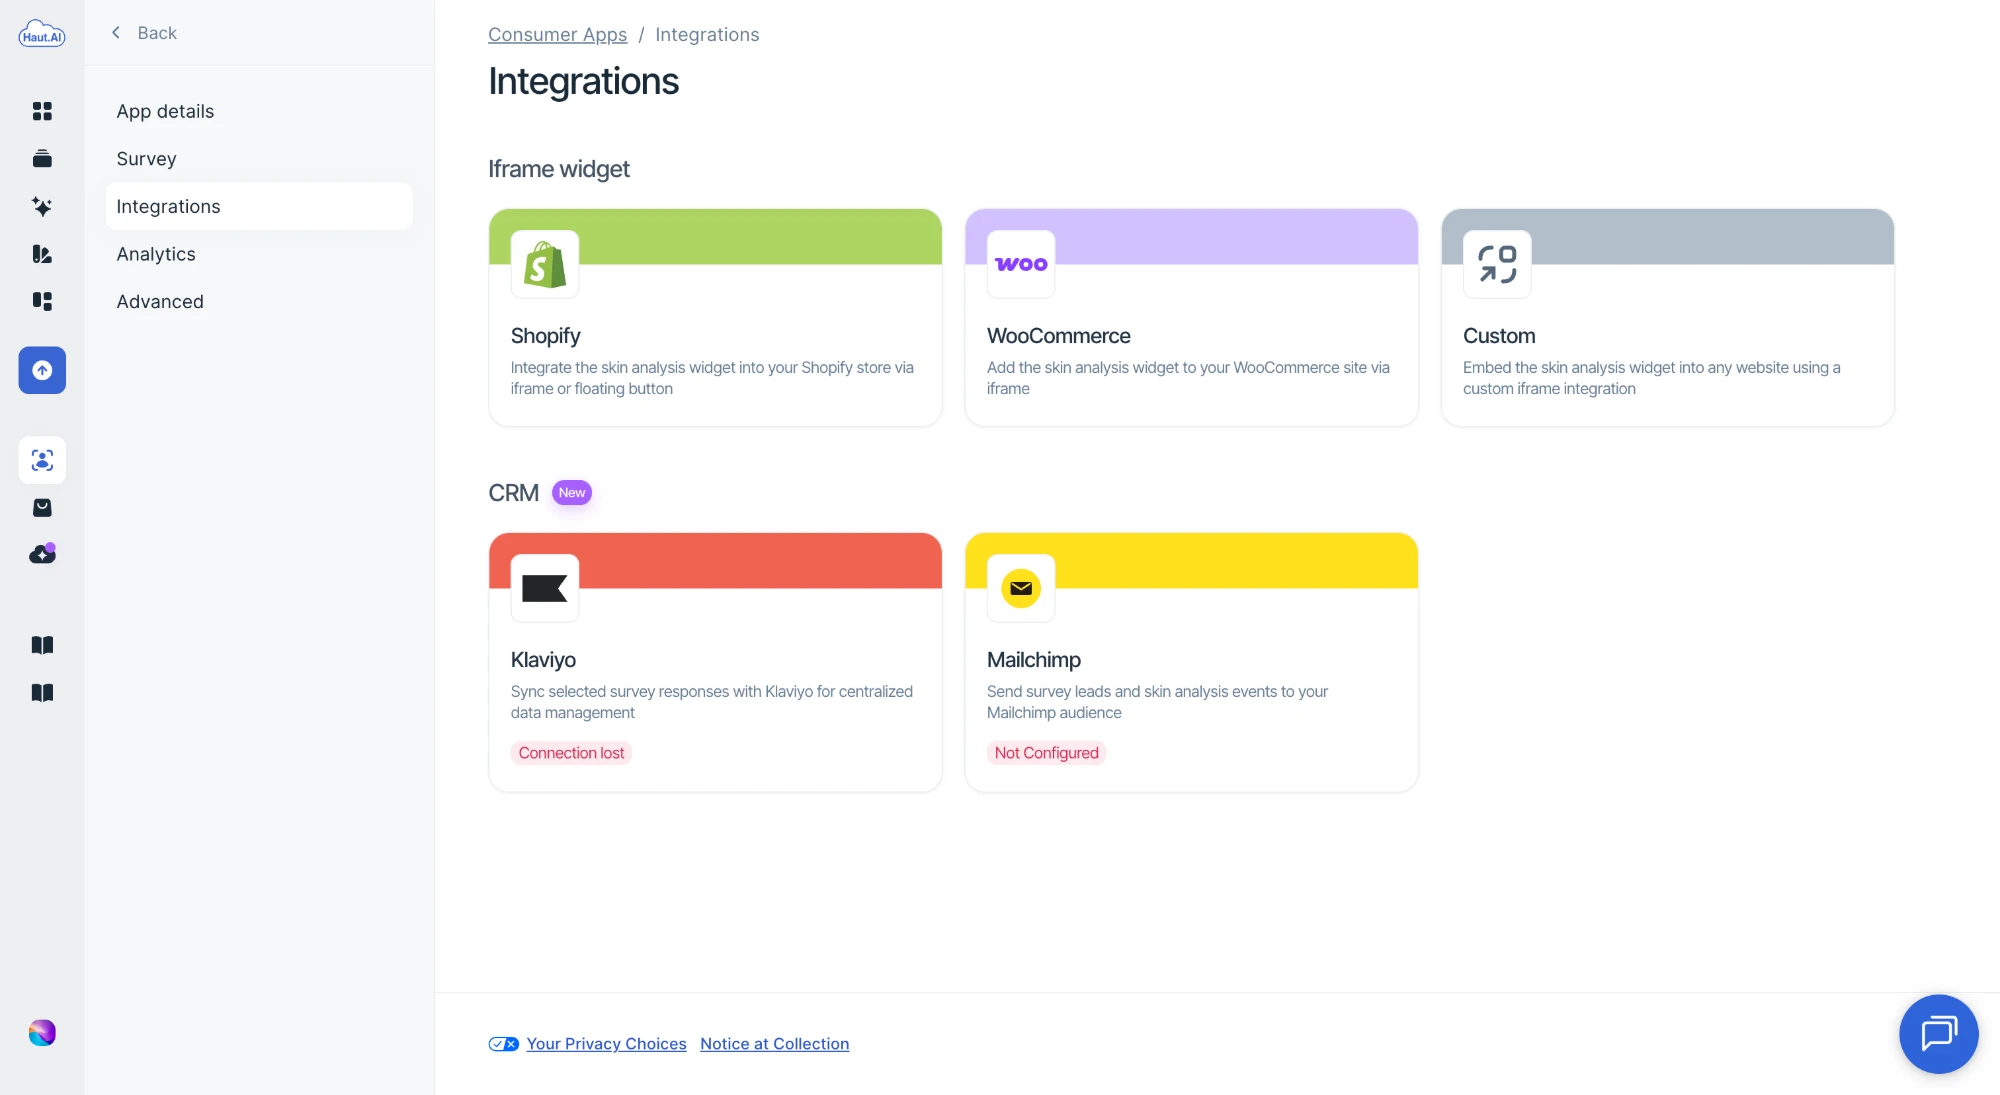
1. Open the **Integrations** section in the navigation menu. Under **CRM**, the **Mailchimp** card shows **Not Configured**. Click it.
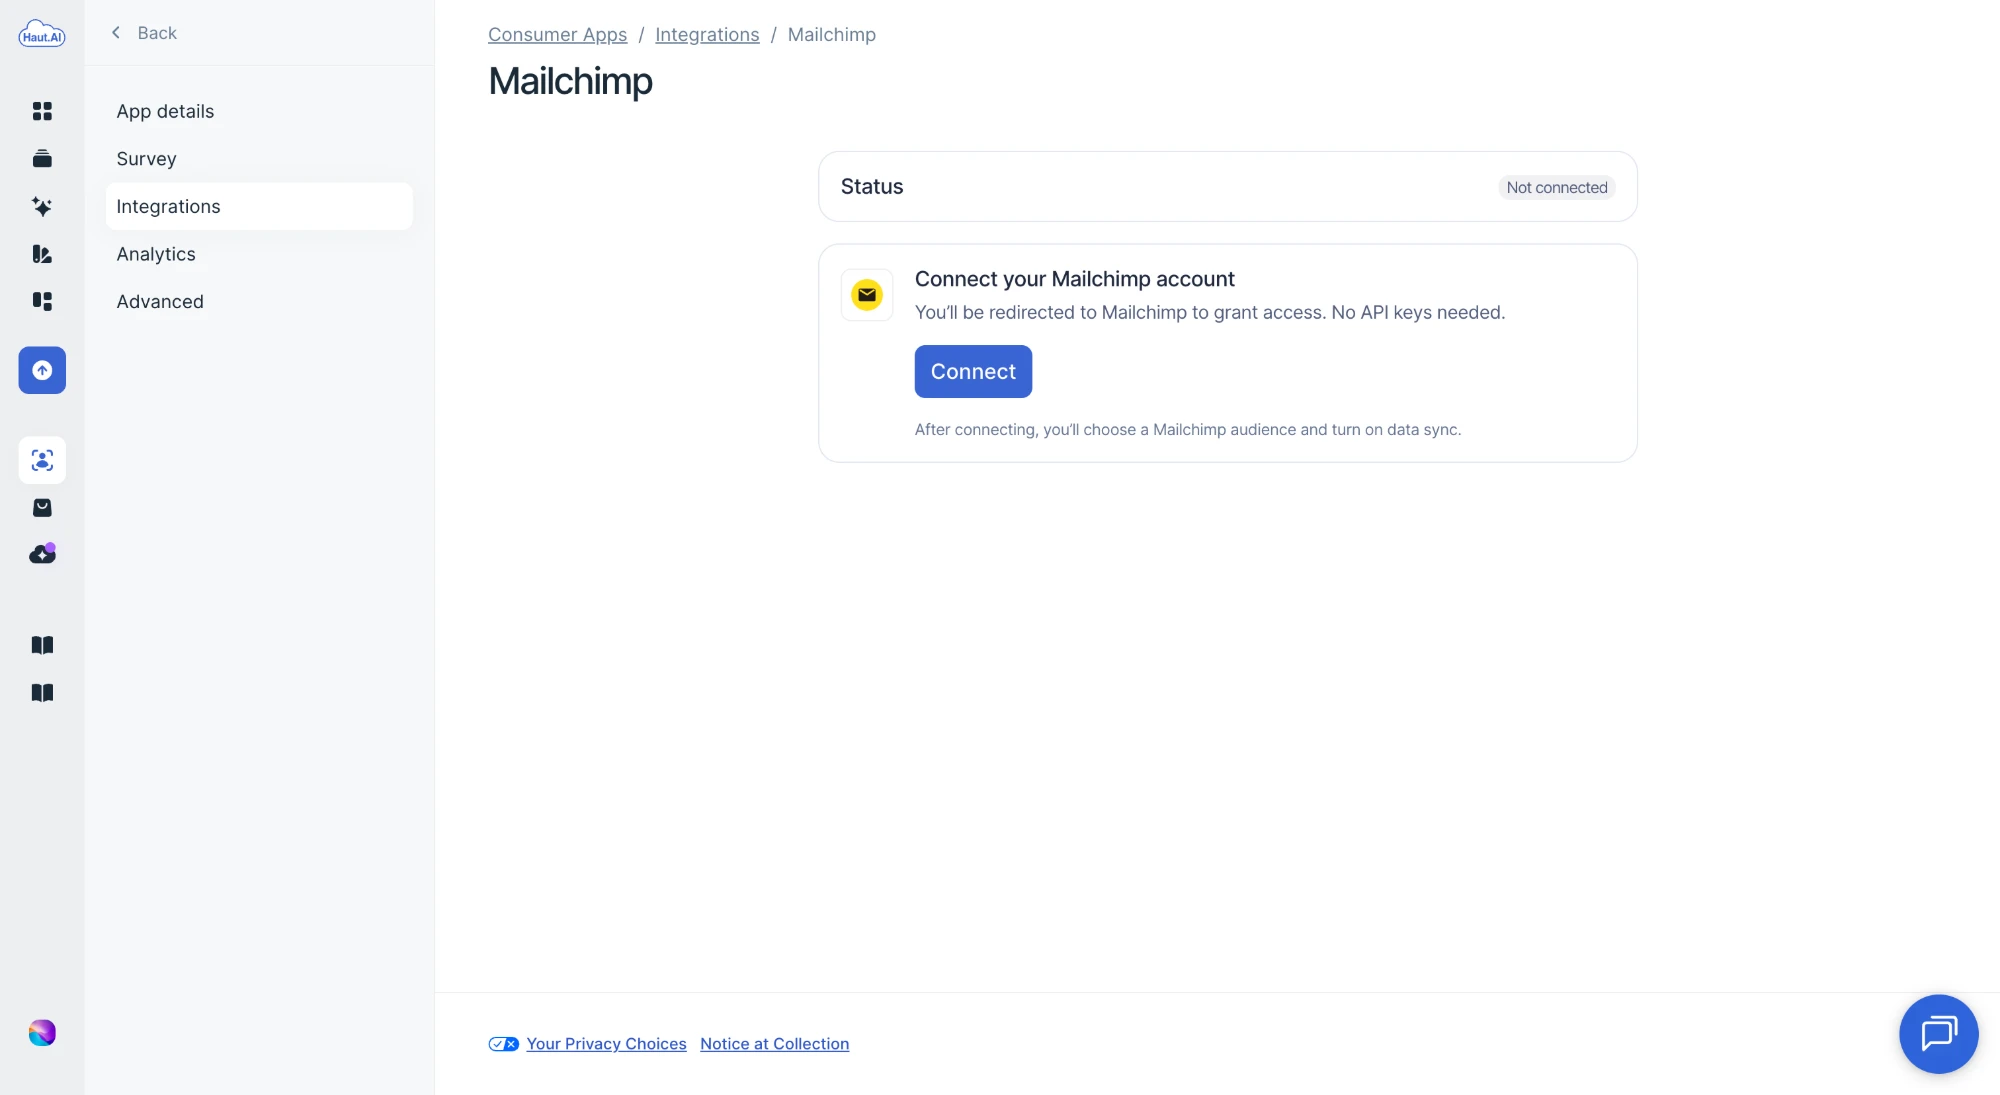
2. The status shows **Not connected**. Under **Connect your Mailchimp account**, click **Connect**. No API key is needed.
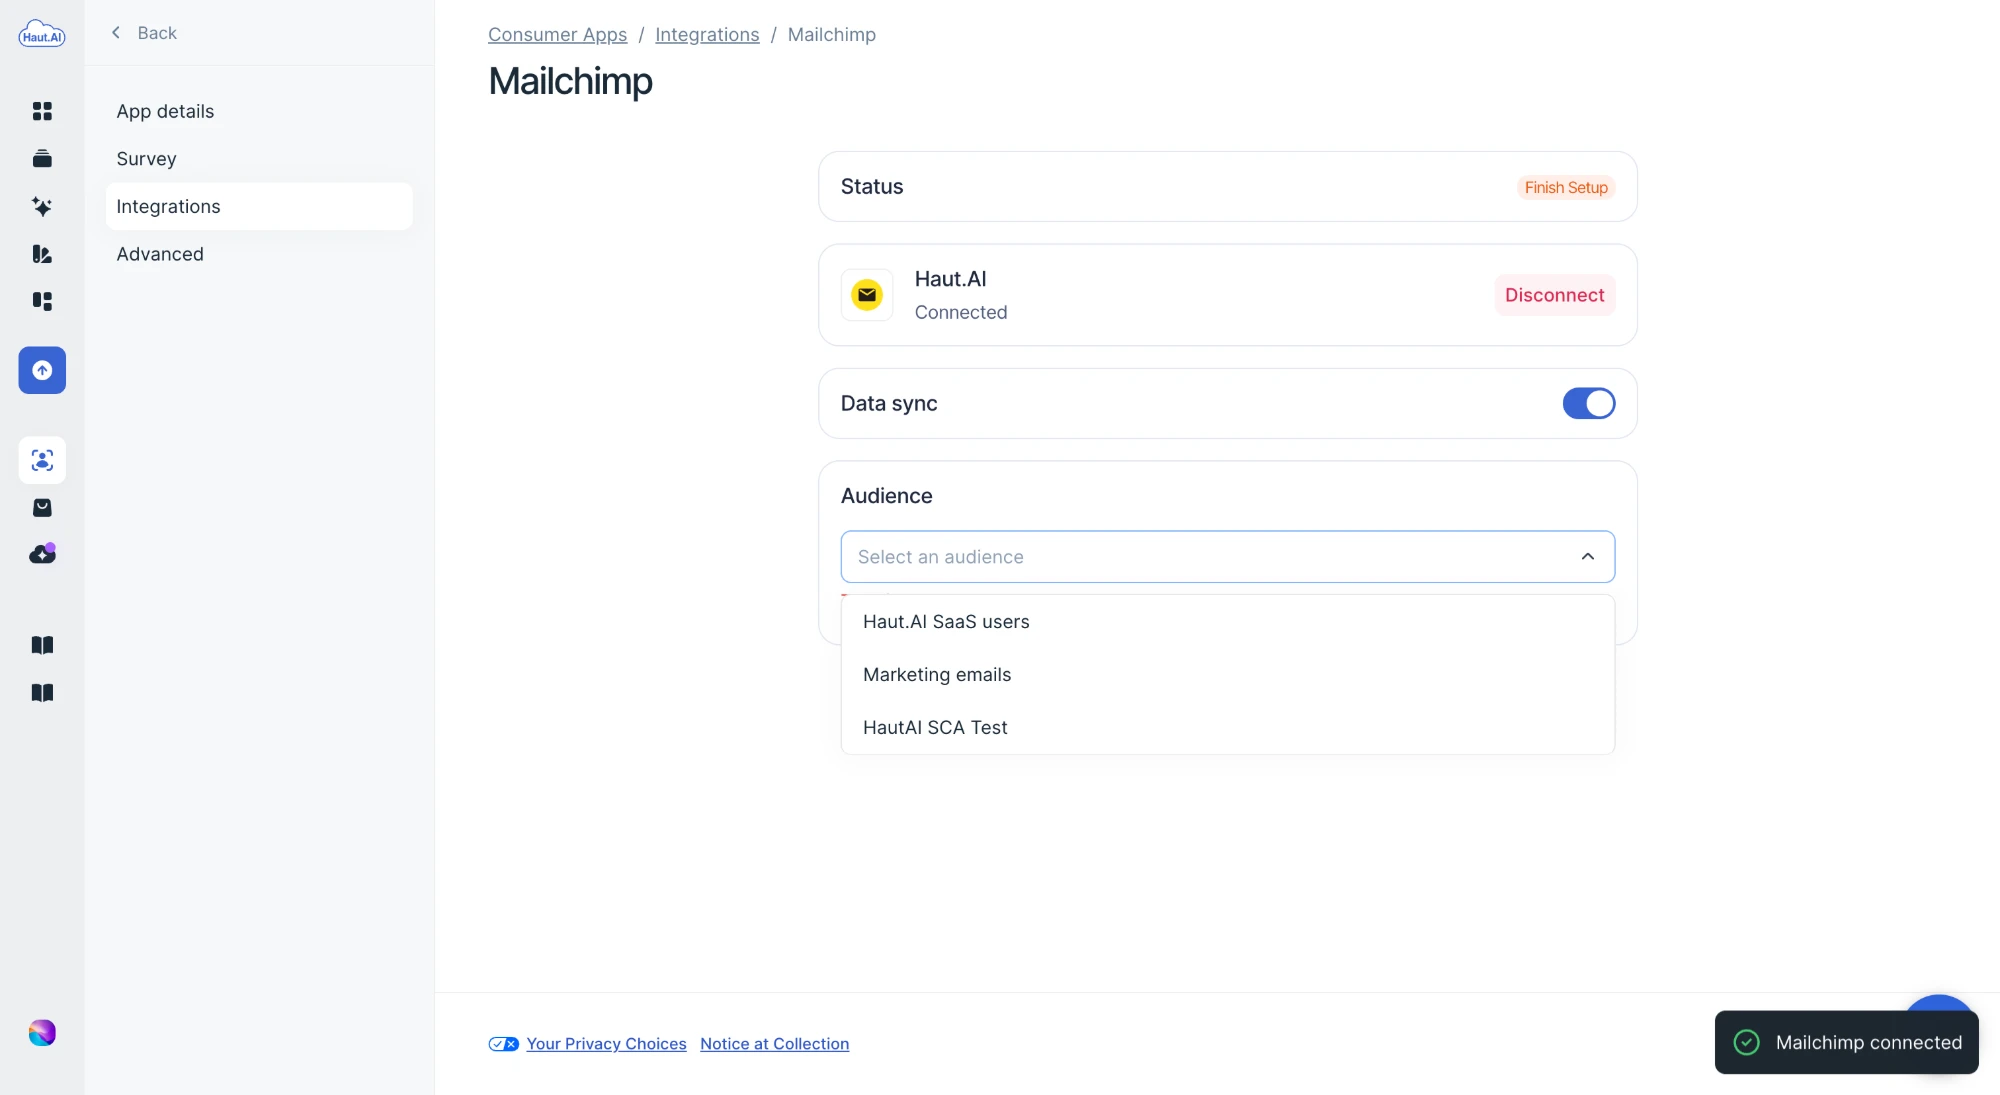
3. You are redirected to Mailchimp. Sign in if prompted and approve the request. Mailchimp then sends you back to the SaaS platform with a **Mailchimp connected** message.
4. The status now reads **Finish Setup**, your Mailchimp account is listed as **Connected**, and **Data sync** is already on. Under **Audience**, open **Select an audience** and choose the audience that should receive contacts. The field is required.
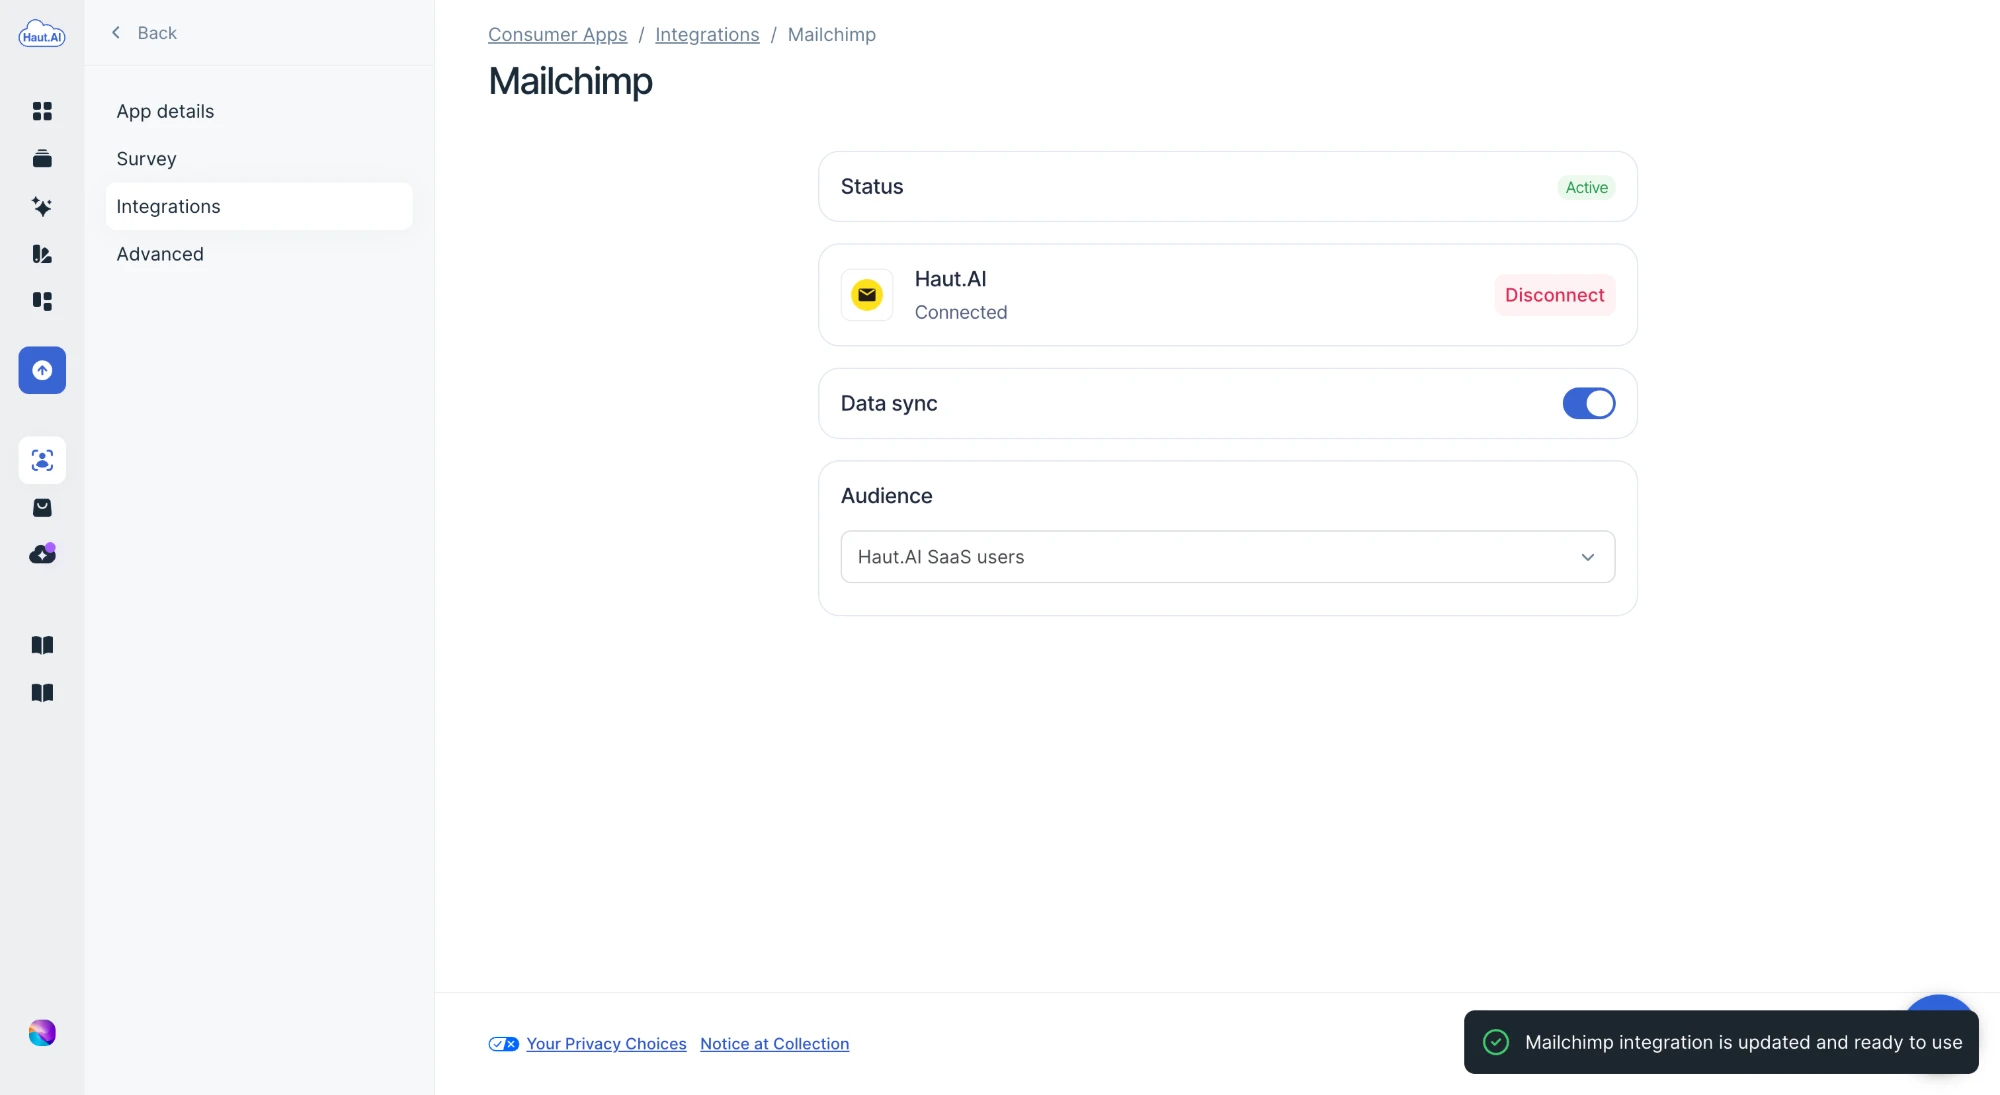
5. Once an audience is selected the status changes to **Active** and a **Mailchimp integration is updated and ready to use** message confirms the setup. Leave **Data sync** on; switching it off pauses sending without disconnecting the account.
{% hint style="warning" %}
Authorizing the integration gives Haut.AI access to the whole Mailchimp account, because Mailchimp does not offer narrower permissions. Haut.AI only reads the audience list and writes contacts and events to the audience you select. To revoke access, click **Disconnect** here or remove the app under **Account → Extras → Registered apps** in Mailchimp.
{% endhint %}
## Verify it worked
Complete the survey and an analysis in your Consumer App with a test email address you control. In Mailchimp, open **Audience → All contacts**, find the address, and check that the **Skin Analysis Complete** event appears in the contact's activity feed. Allow a couple of minutes for the event to arrive.
## How to find or create a Mailchimp audience
1. Sign in to [Mailchimp](https://login.mailchimp.com/).
2. In the left menu, go to **Audience → All contacts**. The current audience name is shown at the top; use the audience menu to switch between audiences.
3. To create a new one, open **Audience → Audience dashboard**, click **Manage Audience → View audiences**, then **Create Audience**.
## Troubleshooting
**The card shows "Connection lost"**
Access was revoked in Mailchimp or the connected account was closed. Data sync is paused and new survey responses are not sent. Your audience and sync settings are kept. Click **Connect** to reconnect, and sync resumes.
**The status stays on "Finish Setup"**
No audience has been selected yet. Choose one under **Audience**; contacts are not sent until you do.
**The audience picker shows the audience as not found**
The audience was deleted in Mailchimp after you selected it. Choose another audience and sync continues.
**Contacts arrive but receive no campaigns**
They were added as **Transactional**, which means the user did not tick the consent checkbox. Check that consent collection is enabled on the Email question. Mailchimp also refuses to resubscribe a contact who previously unsubscribed or bounced; only the contact can do that.
**No contacts arrive at all**
The survey has no Email question, or the user skipped it. Mailchimp is email-keyed, so a phone number alone is not enough.
## Next steps
| Guide | Description |
| ----------------------------------------------------------------------------------------------------------------------------------------------------------- | ----------------------------------------------------------------------------------------------------------------- |
| [Data Sent to Mailchimp](/haut.ai/quick-start-guides/no-code-app-for-e-commerce-businesses/integrate-consumer-app-with-mailchimp/data-sent-to-mailchimp.md) | The contact fields, the subscription-status rules, and every property on the **Skin Analysis Complete** event. |
| [Mailchimp: Create a Customer Journey](https://mailchimp.com/help/create-customer-journey/) | Mailchimp's own guide to journeys. Use the **Event** starting point with the `Skin Analysis Complete` event name. |
***
{% hint style="warning" %}
Not a Haut.AI client yet?
{% endhint %}
Book a demoPlatform overview on haut.ai
---
# Agent Instructions
This documentation is published with GitBook. GitBook is the documentation platform designed so that both humans and AI agents can read, navigate, and reason over technical content effectively. Learn more at gitbook.com.
## Querying This Documentation
If you need additional information that is not directly available in this page, you can query the documentation dynamically by asking a question.
Perform an HTTP GET request on the current page URL with the `ask` query parameter, and the optional `goal` query parameter:
```
GET https://docs.saas.haut.ai/haut.ai/quick-start-guides/no-code-app-for-e-commerce-businesses/integrate-consumer-app-with-mailchimp.md?ask=&goal=
```
`ask` is the immediate question: it should be specific, self-contained, and written in natural language.
`goal` is optional and describes the broader end goal you are ultimately trying to accomplish on behalf of the user. GitBook uses it to tailor the answer towards what is most useful for that goal.
The response will contain a direct answer to the question and relevant excerpts and sources from the documentation.
Use this mechanism when the answer is not explicitly present in the current page, you need clarification or additional context, or you want to retrieve related documentation sections.